Why Set Excel Font Style?
Set font style in Excel can make the content much easier to understand. Author can also make its emphasizing with different styles. On the other hand, different font styles give a good-looking Excel spreadsheet. So, the problem is how to set Excel Font Style. Here I will introduce a solution of using C# set Excel Font Style.
How to Use C# Set Excel Font Style?
Spire.XLS for .NET is .NET Excel component which enables your .NET applications fast generate, read, write and modify Excel document without Microsoft Office Excel Automation. With this .NET component, we can easily use C# set Excel font style.
Download Spire.XLS for .NET (or Spire.Office which includes Spire.XLS) with .NET framework 2.0 (or above) and use the code below to Set Excel font style. You can set text font, size, bold, italic, add color or underline as you like.
C# Excel Font Style:
01 private void ExcelDocViewer( string fileName )
02 {
03 try
04 {
05 System.Diagnostics.Process.Start(fileName);
06 }
07 catch{}
08 }
09
10 private void btnRun_Click(object sender, System.EventArgs e)
11 {
12 Workbook workbook = new Workbook();
13 Worksheet sheet = workbook.Worksheets[0];
14
15 sheet.Range["B1"].Text = "Font setting";
16 sheet.Range["B1"].Style.Font.IsBold = true;
17
18 sheet.Range["B3"].Text = "Arial";
19 sheet.Range["B3"].Style.Font.FontName = "Arial";
20
21 sheet.Range["B4"].Text = "Large size";
22 sheet.Range["B4"].Style.Font.Size = 20;
23
24 sheet.Range["B5"].Text = "Bold";
25 sheet.Range["B5"].Style.Font.IsBold = true;
26
27 sheet.Range["B6"].Text = "Italic";
28 sheet.Range["B6"].Style.Font.IsItalic = true;
29
30 sheet.Range["B7"].Text = "Superscript";
31 sheet.Range["B7"].Style.Font.IsSuperscript = true;
32
33 sheet.Range["B8"].Text = "Colored";
34 sheet.Range["B8"].Style.Font.Color = Color.FromArgb(255,125,125);
35
36 sheet.Range["B9"].Text = "Underline";
37 sheet.Range["B9"].Style.Font.Underline = FontUnderlineType.Single;
38
39 sheet.AutoFitColumn(2);
40
41
42 workbook.SaveToFile("Sample.xls");
43 ExcelDocViewer(workbook.FileName);
44 }
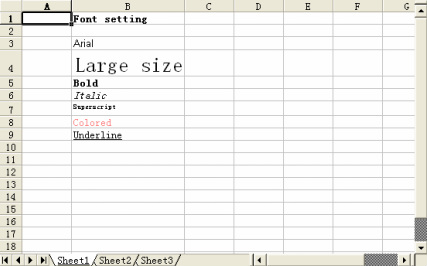
After run the code above in your application, you will get the spreadsheet as the below:
Set font style in Excel can make the content much easier to understand. Author can also make its emphasizing with different styles. On the other hand, different font styles give a good-looking Excel spreadsheet. So, the problem is how to set Excel Font Style. Here I will introduce a solution of using C# set Excel Font Style.
How to Use C# Set Excel Font Style?
Spire.XLS for .NET is .NET Excel component which enables your .NET applications fast generate, read, write and modify Excel document without Microsoft Office Excel Automation. With this .NET component, we can easily use C# set Excel font style.
Download Spire.XLS for .NET (or Spire.Office which includes Spire.XLS) with .NET framework 2.0 (or above) and use the code below to Set Excel font style. You can set text font, size, bold, italic, add color or underline as you like.
C# Excel Font Style:
01 private void ExcelDocViewer( string fileName )
02 {
03 try
04 {
05 System.Diagnostics.Process.Start(fileName);
06 }
07 catch{}
08 }
09
10 private void btnRun_Click(object sender, System.EventArgs e)
11 {
12 Workbook workbook = new Workbook();
13 Worksheet sheet = workbook.Worksheets[0];
14
15 sheet.Range["B1"].Text = "Font setting";
16 sheet.Range["B1"].Style.Font.IsBold = true;
17
18 sheet.Range["B3"].Text = "Arial";
19 sheet.Range["B3"].Style.Font.FontName = "Arial";
20
21 sheet.Range["B4"].Text = "Large size";
22 sheet.Range["B4"].Style.Font.Size = 20;
23
24 sheet.Range["B5"].Text = "Bold";
25 sheet.Range["B5"].Style.Font.IsBold = true;
26
27 sheet.Range["B6"].Text = "Italic";
28 sheet.Range["B6"].Style.Font.IsItalic = true;
29
30 sheet.Range["B7"].Text = "Superscript";
31 sheet.Range["B7"].Style.Font.IsSuperscript = true;
32
33 sheet.Range["B8"].Text = "Colored";
34 sheet.Range["B8"].Style.Font.Color = Color.FromArgb(255,125,125);
35
36 sheet.Range["B9"].Text = "Underline";
37 sheet.Range["B9"].Style.Font.Underline = FontUnderlineType.Single;
38
39 sheet.AutoFitColumn(2);
40
41
42 workbook.SaveToFile("Sample.xls");
43 ExcelDocViewer(workbook.FileName);
44 }
After run the code above in your application, you will get the spreadsheet as the below:
 RSS Feed