C# Excel by Merging Cells into One
For most of Excel developers, sometimes they may have to face a problem that they have to merge two or more cells together to form one big cell whatever horizontally or vertically in a spreadsheet. However, that is very effective for laying out spreadsheet titles. Spire.XLS, a powerful .NET/Silverlight Excel component for developers, allows users to merge Excel cells into one by using C#/VB.NET and with a few sentences of code.
Download Spire.XLS here, install Spire.XLS on system and follow the simple steps below to use C# merging Excel cells.
Friendly Reminder: Please make sure Spire.XLS and Visual Studio are correctly installed on system.
Step 1 Create Project
Create a C#/VB.NET project in your visual studio. Add Spire.XLS.dll as reference. The default setting of Spire.Xls.dll is placed under "C:\Program Files\e-iceblue\Spire.Xls\Bin”. Select assembly Spire.Xls.dll and click OK to add it to the project.
using Spire.Xls;
namespace CellsMerge
{
class Program
{
static void Main(string[] args)
{
}
}
}
Step 2 Load Excel File
Use the code below to load Excel file in which we will merge Excel files.
//load the excel template
Workbook workbook = new Workbook();
workbook.LoadFromFile(@"..\..\parts.xls", ExcelVersion.Version97to2003);
Step 3 Merge Excel Files
Select the cells which we need merge into one. Follow the samples below and we can merge cells at will.
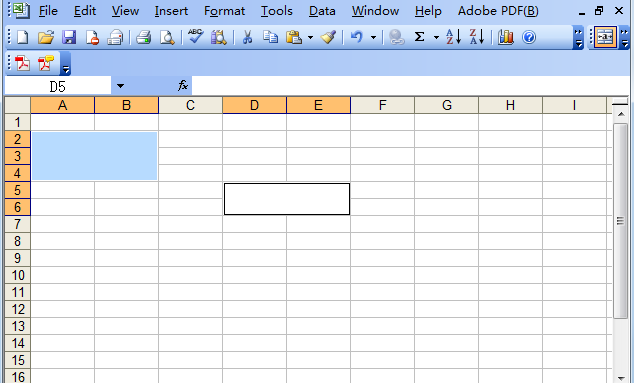
//merge A2-D4 to one cell
Worksheet sheet = workbook.Worksheets[0];
sheet.Range["A2:B4"].Merge();
//merge D5-E6 to one cell
sheet.Range["D5:E6"].Merge();
Step 4 Save and Preview
After finish merging Excel cells, save the modified Excel file as .xls format. And we can preview what we’ve done by pressing F5 to launch the project.
//save the workbook
workbook.SaveToFile(@"..\..\cellsMerge.xls", ExcelVersion.Version97to2003);
//launch the workbook
System.Diagnostics.Process.Start(@"..\..\cellsMerge.xls");
Let’s check out the output effective screenshot:
Download Spire.XLS here, install Spire.XLS on system and follow the simple steps below to use C# merging Excel cells.
Friendly Reminder: Please make sure Spire.XLS and Visual Studio are correctly installed on system.
Step 1 Create Project
Create a C#/VB.NET project in your visual studio. Add Spire.XLS.dll as reference. The default setting of Spire.Xls.dll is placed under "C:\Program Files\e-iceblue\Spire.Xls\Bin”. Select assembly Spire.Xls.dll and click OK to add it to the project.
using Spire.Xls;
namespace CellsMerge
{
class Program
{
static void Main(string[] args)
{
}
}
}
Step 2 Load Excel File
Use the code below to load Excel file in which we will merge Excel files.
//load the excel template
Workbook workbook = new Workbook();
workbook.LoadFromFile(@"..\..\parts.xls", ExcelVersion.Version97to2003);
Step 3 Merge Excel Files
Select the cells which we need merge into one. Follow the samples below and we can merge cells at will.
//merge A2-D4 to one cell
Worksheet sheet = workbook.Worksheets[0];
sheet.Range["A2:B4"].Merge();
//merge D5-E6 to one cell
sheet.Range["D5:E6"].Merge();
Step 4 Save and Preview
After finish merging Excel cells, save the modified Excel file as .xls format. And we can preview what we’ve done by pressing F5 to launch the project.
//save the workbook
workbook.SaveToFile(@"..\..\cellsMerge.xls", ExcelVersion.Version97to2003);
//launch the workbook
System.Diagnostics.Process.Start(@"..\..\cellsMerge.xls");
Let’s check out the output effective screenshot:
More about Spire.XLS:
Spire.XLS doesn't need Microsoft Office Excel Automation. It allows user to operate Excel document directly such as save to stream, save as web response, copy, lock/unlock worksheet, set up workbook properties, etc. Click to learn more…
Spire.XLS doesn't need Microsoft Office Excel Automation. It allows user to operate Excel document directly such as save to stream, save as web response, copy, lock/unlock worksheet, set up workbook properties, etc. Click to learn more…
 RSS Feed